Introduction
Installation
How to launch PovFront
MENUS
File Menu
Options Menu
Jobs Menu
Help Menu
General description
The header
The buttons
The options pages
BUGS
Back to povfront mainpage
This manual aims at providing some information about the use of PovFront.
You'd better have some knowledge about povray before starting since this manual is not a documentation for povray.
English is not my native langage, so you may find a lot of mistakes or mispells. Just let me know what's wrong ;-)
Installation
I assume you got the archive from this web site or from the Giram package.
There is also a RPM package available on this site. If you use it, you don't need to read the installation part of this manual
- Content of the source archive:
AUTHORS
It is a a short text file about the authors of the file.
COPYING
A short text file about the GPL license
README
A short text about internazionalisation
CONTRIBUTORS
The list of people who provided some significant work on povfront
>subset.xpm
An image used in the interface of povfront
povfront.h
The header of the source code
povfront.c
The program source
Makefile
To build the binary code of povfront
Makefile.gnome
An alternate Makefile to test some gnome stuff
povfront.po
for french internationalization
povfront.mo
for french internationalization
ChangeLog
A short text file describing the evolution of the code
- How to install from the source archive
If you have downloaded the 1.1 version, read the file README, you are not concerned by this paragraph since I've added a configure script (autoconf).
Okay, you got the povfront-1.0.tar.gz package.
a) Put it in the right directory (i.e. /usr/src).
b) Decompress the code:
gunzip povfront.tar.gz
c) Extract the files from the archive:
tar xvf povfront.tar
d) You will get a new directory : /povfront-1.0
e) Enter this directory
cd povfront-1.0
f) Make the program
make
If you don't succeed to compile the program, report the bug to clovis1@club-internet.fr
- Continue Installation
Let's make a try and see if it works.
./povfront
Now make a symbolic link to this program
ln -s povfront ~/bin/povfront
or something like that
A translation for french is provided in the package. In order to use it, copy the translation file in the directory:
cp povfront.mo /usr/share/locale/fr_FR/LC_MESSAGES
Depending on the distribution you use, the directory may be different but I cannot tell you more now.
Define the environment variable:
export LC_ALL=fr_FR
It is the same for the other langages. but don't forget to rename the file povfront.mo
For example with an italian tranlation file:
cp povfront.it.mo /usr/share/locale/it/LC_MESSAGES/povfront.mo
To launch PovFront, simply type: povfront
Povfront also supports some options in the command line which allows it to act like a plugin for other applications.
- povfront --help
Give a short message about the PovFront options:
Usage: povfront [-c FILE] [SOURCE]
povfront is a front end for POVRAY ray tracing engine
-c FILE where FILE specify a configuration file
-i IMAGE where IMAGE specify the image file to render
SOURCE is a pov source file
--version display the name and the version of the software
--help display this text
please report any bug to clovis1@club-internet.fr
- povfront --version
Give the name and the version of povfront:
povfront version 0.9.0 is a GNU's GPL utility
from Ph. P. E. DAVID
- povfront -c FILE
Launch PovFront and load directly a configuration file. Note that the default configuration file is not loaded.
- povfront -i IMAGE
Launch PovFront with the image field already filed with the name of the image. Note that the default configuration file is parsed but that the image field cannot be changed.
- povfront FILE
Launch PovFront with the source file already filed with the source file name. Note that the default configuration file is parsed but the source file name cannot be changed.
This option is useful when PovFront is used as a plug in.
This menu provides three entries:
- Load Config
The user have the possibility to save the set of options he defines. Thus loading these saved options could be useful. There is no default name for these files. Click on this item to get a file selection window. You may get an error while loading a configuration file. May be you have edited manually this file which is not recommended. Anyway, in case of error, save an other configuration file to clean it up. A configuration file have exactly the same format as the default configuration file. But to save the default configuration file, use the save as default item from the option menu.
- Save Config
Save the set of options currently defined in povfront by the user. Default options are saved with the "save default" item of the menu option.
- Quit
Exit PovFront.
You will find here the following items:
- Configure
This item launches a window which lets the user define some general options about povfront.
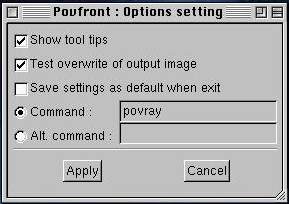
- Save default
It does the same work as Save Config. but in a pre-defined file which is read every time you launch PovFront. It save all the options of the program in the file ~/.povfront/default.txt. You must not edit this file by yourself as the other configuration files.
This menu provides an item to launch the job control window.
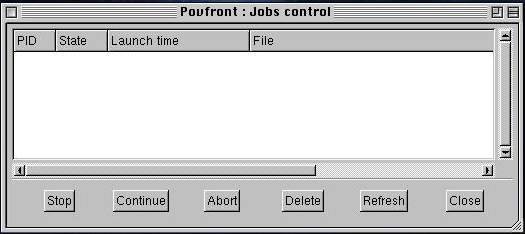
The job controller is a window which give the list of past and active process.
Here what it looks like:
Two items in this menu:
- About...
This launch a window with general information about PovFront
- Help
There is not help available at this moment. When I'll release it, it will be accessable through this item.
General Description
The main window of PovFront is composed of 3 main parts. At the top of the window, the main options: the header then, come the buttons to launch rendering and to stop the last rendering, at the bottom come the options pages presented as a note book.
- The header

It is composed of:
- The pov file to parse
- The image to calculate
- A possible redirection of the output toward a filter
You could ask why there are some check buttons with these options. The check button for the pov file is for future options. When PovFront is able to specify a script file, this check button authorizes the user to keep a pov file name without asking povray to parse it.
The radio button are for:
- The generation of the image to the disk
- The redirection of the image to a filter.
Actually, when you choose this option, povfront redirects the output to the console then you can specify a command to filter this output. The file name on the first line is not used, instead, povfront generates a -o- option.
- "none" is used to not write any image.
In this case, it meens that you just want to see the rendering. You must have selected the display image option or povray will calculate an image whitout showing it to you and without writing it on the disk. It is a good way to spoil CPU time.
- The buttons

The buttons are:
- Render
To launch the rendering by generating a command line with all the specified options then forking to create a process. When launched, the calculation is visible from the job control window. It is possible to launch a lot of calculation even if the last ones are not finished. All the processes will be visible in the job control.
- Abort the last job
It lets the user stop the rendering by sending a kill signal to the last launched process. To abort or stop older process, you have to go in the job control.
- The options pages

The image above shows the quality page. Other options are available by clicking on the corresponding handle. All the available options of povray are present. A more precise description of these options is available later in the manual.
BUGS
If you get this error:
INI file error.
Bad option syntax or error opening .INI/.DEF file ''.
Povray cannot run with file name with accents in the path.